Friday, December 14, 2018

Hansel and Gretel Did What They Had to Do


Hansel and Gretel knew what they were doing when they started munching on the Gingerbread house that they found in the forest. Just imagine the scene. You’re lost in the woods. You thought you had a plan by dropping bread crumbs along your path to find your way home. (Okay, not the smartest way to go, but its all you had in the house. Remember, they were poor.) As you look back to make sure the crumbs are still there, you notice a flock of birds are following you. They have been merrily pecking the leftovers in your trail.  Surrounding you are  trees upon trees. Nothing looks familiar. You have no idea how far you have walked, or how long. (Because you don’t own a watch.) The only thing  you do know is that you’re hungry. Your stomach is growling so loud, it almost sounds like the wolf in the Little Red Riding Hood story. 

Standing there, confused and terrified, you suddenly smell the warm scent of ginger and spices. You lift your head and continue to sniff. Where is that inviting scent coming from? You turn to your sibling and smile. Together you skip down the path that leads to a clearing. That’s when you see it. There’s a little cottage sitting amongst the forest. The walls are golden brown and laced with a white creamy frosting.  The windows beside the door are framed with striped pieces of peppermint, while the door itself is a very large piece of dark chocolate. You see the walkway lined with marshmallows and gumdrops.  The very shingles on the house are vanilla cookies with sprinkles. The entire cabin is designed with all your favorite goodies. 

When your stomach howls again, there is only one thing you can do. You must indulge. You take a bite into the side corner of the house. The aroma of gingerbread cannot be ignored. The fire inside the house warms the delicacy and your mouth waters for more. The spicy flavor melts against the top of your tongue and the sensation stirs your belly. Never have you enjoyed such a treat as this. 

Gingerbread is typically a seasonal food. Most people don’t ever think of making gingerbread or gingerbread cookies in the middle of summer. Its traditionally served in the colder months of the year, especially at Christmas. Hundreds and thousands of gingerbread houses and cookies are baked each year. Many kits are now sold in retail stores. However, they don’t compare to the kind that is prepared and baked in your own kitchen. Nothing says “Merry Christmas” more than the scent of ginger and cinnamon emerging from your oven with the cut out shapes of little men (and women) lying on a cookie sheet. When you bake gingerbread, everyone knows it and they come running - just like Hansel and Gretel. 

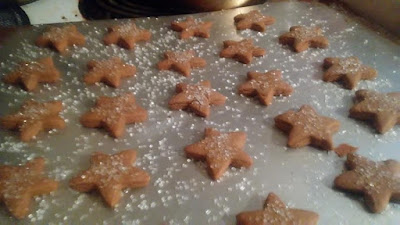
The recipe I have enclosed is so easy, and yet so delicious. My goal was to give these cookies as a gift, but I will admit, only half of them made it into my mason jars. Once my son and I tasted these little gingerbread men and Christmas trees, they slowly disappeared into our mouths. For decorations, I merely sprinkled colored sugars on top of each one. Nothing else was needed. Of course, its possible to adorn each man and tree with frosting and tiny silver balls, or mini candies, just to make them more tempting. Its your choice. I cut my shapes with miniature cookie cutters for the sake of packaging, but regular size are great too. Either way, this recipe makes a few dozen for your enjoyment. Give them away as gifts, or enjoy them yourself - just like Hansel and Gretel. 

Gingerbread Cookies

3 ¼ cups flour
1 TBL Cinnamon
1 TBL Ginger
1 tsp pumpkin pie spice
1 tsp baking soda
½ tsp salt
¾ cup shortening plus 1 ½ TBL water
½ cup light brown sugar (packed)
1 large egg
½ cup molasses
2 tsp vanilla

In large bowl, mix together flour, cinnamon, ginger, pumpkin pie spice, b. soda and salt. Set aside.

In another bowl, beat shortening, water, and brown sugar until light and fluffy. Add egg, vanilla and molasses. Mix well.

Add flour combination gradually to the wet mixture, stirring or beating until combined thoroughly.

Cover bowl and refrigerate dough for at least 2 hours. The colder the dough, the easier it is to roll out.

Preheat oven to 350 degrees.

When ready, lightly flour surface to roll out dough. Divide dough into 2 - 3 balls. With floured rolling pin, roll out ball of dough evenly  to  ¼ - 1/8 inch thick. Flour cookie cutters and cut out shapes. **

Place cookies on  un-greased baking sheets. Sprinkle on colored sugars or sprinkles for easy decorations. **

Bake in oven for 8 to 10 minutes, depending on size of cookie. Cookie is done when it appears firm and is slightly crisp on the edges. Remove from oven and let cool for 5- 10 minutes. Remove cookies from pan; let rest on paper towels or cookie rack.

These cookies are great for gift giving if you fill a mason jar and cover the top with fabric and ribbon!

**More Options**

Cookie dough may be shaped into small 1 inch balls instead of using cookie cutters.

Decorate the cookies with  your favorite frosting once they are cooled.

If you use butter or margarine instead of shortening, omit the water.

This recipe bakes a warm brown colored cookie, using a dark brown sugar will intensify the color  to a deep dark brown.


Saturday, November 17, 2018

Autumn and Apple Crisp

Whispering breezes flow through the branches of the trees as the sun sets earlier and earlier. Shadows of the moon play hide and seek in the clouds. The bright chlorophyll green of the leaves has disappeared, only to be replaced with crimson red and golden yellow. Children have returned to school and large orange pumpkins are sitting on front  porches everywhere. Autumn has come around again.

As the days grow colder, and the nights come sooner, the sweet aroma of cinnamon and spices wafts in and out of most kitchens during this transitional season. It’s the time when ovens are turned on again, and people begin to settle in for the duration. It’s also the time when apples have matured and are ready to be picked off their branches.

When I was little, my family and I always took time out of our schedules to go apple picking. My mom and dad made a whole day of it. My sisters and brother and I would be excited for weeks and could barely wait  for that special Saturday to arrive. It was always in the late afternoon, and always at the same orchard. We would wear our heaviest sweaters and jeans, and sometimes we would have to don hats and gloves. (Maine autumn weather is extremely chilly and unpredictable. On one occasion it actually snowed!) That never stopped us from going though. One cold day of  apple picking beat out one afternoon of chores anytime!

We would drive for almost 40 minutes to reach our destination. I still remember passing by acres of cows and fields until we turned onto the lonely road that brought us nearer. My sisters and I would start watching for the rows and rows of apples alongside the way. That‘s when we knew we were almost there. When we arrived, dad would drop Mom and us kids off in front of the barn so we could get our bags. Then he would park the car and join us. Sometimes, if it wasn’t that busy and there was a close enough spot, we would all wait to go into the barn together, but usually that wasn’t the case. Se we would wait for my father to walk down the dirt road, smoking his cigarette and waving to his silly family up ahead. Once he met with us, he always grabbed the tall apple picking utensil  that the orchard provided. This was the easy way to pick the really good fruit on the higher branches.

Together we would embark on our journey, looking for the trees that supported the most apples. Mom would test each tree by biting into an apple to taste if it was sweet. It was good, we stopped and began picking. If it wasn’t, we traveled on to the next one. As kids, following in our mother’s footsteps, we grew to refine our apple tasting too. We also were taught which apples to pick. If there were any bruises or brown spots, or any kind of black holes on that piece of fruit, it was immediately discarded. Mom only chose the best. That also meant that we delicately placed those apples into our barrels and bags too. There was no tossing or throwing our Macintosh. The very brightest and sweetest apple could be marred for life if it were dropped on the ground. Mom was extremely particular about what she bought and brought home.

As our buckets filled and our tree climbing skills grew weary, it was time to walk back to the barn and pay for our wares. Dad would bring the car back and we would carefully fill the trunk with our day’s work. All of us would grab an apple to eat on the way home - all of us, except Dad. He didn’t like to eat raw fruit. He would wait for the scrumptious apple desserts my mom would make as soon as she hit the kitchen. The apples would be peeled for homemade applesauce and biscuits for dinner, and  freshly baked apple pie or apple crisp for dessert. Such delicious aromas filled our house as we waited once again for our reward.

My mom doesn’t cook using recipes. She comes from a long line of women who know instinctively what spices to add to a dish to make it taste great. She made her applesauce that way and any other apple dessert that popped into her head. The recipe for apple crisp here has measurements, but feel free to add or decrease whatever fits your preferences. My family happens to love cinnamon and it shows in our recipes. Enjoy this apple crisp with your loved ones. It may start a whole new tradition for you too.


                                April’s Apple Crisp


Ingredients

5-7 apples (depending on size)
1 cup sugar
4-5 teaspoons cinnamon
1-2 tablespoons flour

For the topping: 
1 cup brown sugar
¼ cup white sugar
½ cup flour
¾ cup oatmeal
3 teaspoons cinnamon
Dash of nutmeg
1/2 cup of butter/margarine


Directions

Preheat oven to 375 degrees.
Spray bottom of 7 x 11, or 9 x 13 inch pan with cooking spray for easier clean up.

Peel and slice apples into nice bite size pieces. (For new bakers – do not use the cores. J) Place in large bowl, then add cinnamon and sugar. Mix well until all apples are coated. Taste the apples; if the mixture is sweet enough, it’s done. If you prefer it sweeter, add more sugar and/or cinnamon, depending on your preference. Add the flour to keep filling from becoming too runny. Let apple mixture sit for 5-10 minutes. If it looks too syrupy, add more flour one tablespoon at a time. Mix well. 


While apple mixture is resting, mix together the sugars, flour, cinnamon, and nutmeg. Add oatmeal and stir thoroughly. Chop butter/margarine into small chunks and add to dry mixture. With your hands, combine the shortening into the blend. Continually work/mash it  together until it crumbles into pea size balls. (A pastry blender, or a fork and knife also work. Just mash and cut for the same outcome.)
To bake, pour apple mixture into prepared pan. Use the larger size if you used a lot of apples. Top with an even coating of the oatmeal crumble. Press down firmly. 

Bake in oven for 30 to 35 minutes. Top should be slightly golden brown and apples should be bubbling underneath. 

Let cool slightly. Enjoy with a dollop of ice cream and your favorite fall beverage! 


If your taste buds need the warm and gooey flavor of apple pie, the recipe is included on this site as well. It's the first blog I ever posted, and it's in my cookbook!

Find more recipes like this here:

myBook.to/LovefromSistersKitchen

Wednesday, September 26, 2018

Autumn Flavors in the Morning


Gentle breezes tug at the red and gold leaves still hanging on a tree. Crisp, late evenings are filled with roaring yellow bonfires and big, bright moons. Giant orange pumpkins proudly sit on decorated front porch steps. Fall has finally arrived. 

Autumn is my favorite time of the year. There are so many colors on the horizon, and the weather cools down so I can wear all my best sweaters and jackets. It is the perfect time for home cooked meals and special desserts. Summer swelters with the high temperatures and balmy humidity. No one wants to cook, and baking is done only on rainy days. However, autumn allows us to explore old cookbooks for recipes that belonged to our long, lost grandmothers. We eat more soups, and bake more casseroles. The slow cooker is back on the counter again, and we wrap ourselves in the comfort foods of the season. 

Pumpkin flavored everything seems to pop up everywhere during this time of the year, and I certainly have my own go-to items that contain the orange gourd. I make pumpkin bread, pumpkin cookies, and pumpkin seeds anytime from September to March, but when I really want something rich and decadent for a dessert, I choose gingerbread. There is something about the sweet molasses and bold kick of ginger that warms up my cold, fall evenings. I absolutely love the dark auburn square of deliciousness topped with a swirl of vanilla white crème on top. Everything about it sings Autumn. 

When I found the recipe for gingerbread muffins, my chilled mornings of breakfast took a turn for the better. Here was a scrumptious way to begin my day with a warm hug and a cup of tea. The recipe is easy and makes approximately 12 regular sized muffins, but can also be adapted to a mini muffin too for a special treat for any occasion. To be honest, a dollop of whipped cream works for this recipe too. Its just too yummy and easy not to try. 


Gingerbread Muffins

Ingredients:

½ cup water
¼ cup margarine or butter
1 egg
¼ cup molasses
¼ cup sugar
1 cup flour
2 tsp ground cinnamon
1 tsp ground ginger
1 tsp baking soda

Directions:

Preheat oven to 350 degrees.
Line cupcake tins with papers or grease generously.

Place butter and water in a microwave safe bowl or measuring cup. Heat in microwave for 2 minutes.

In separate bowl, whisk egg well. Add molasses and sugar and mix well. Add water and butter mixture and stir again.

In another bowl, add all dry ingredients together. Slowly whisk into the wet ingredients, making sure bumps are dissolved.

Spoon mixture into prepared muffin tins. Bake for 20 to 22 minutes. (For mini muffins, bake for only 10 minutes.)

Cool 5 minutes before removing from pan.

Makes 12 regular size muffins or 24 mini muffins. (78 calories per reg. muffin)


Buy Cookbook Here:

Monday, August 20, 2018

My Street Corn


Summertime means summer foods. That’s when we dust off those grills that have been sitting under the porch all winter, and begin searching for the charcoal and lighter fluid. Unless you’re dealing with a gas grill, then its time to refill those tanks! Either way, its time for hamburgers, hot dogs, watermelon, and corn on the cob.

I love corn on the cob, I have since I was a little girl. I could nibble off every kernel of corn off that ear better than anyone else in my family. My siblings and I would hold contests to see who could clean off that cob better, and I almost always won! There is nothing better than a hot, buttered, and slightly salted ear of corn at a summer picnic!

However, as I grew older and had a family of my own, their taste for corn on the cob was not as exuberant as mine. My son didn’t really care for corn at all; and my husband preferred to have his corn off the husk. That meant those delectable, yellow, puffy pillows of sweetness all nestled in their beds had to be cut off. At first, I would shear them off myself, being such the devoted wife that I was. As years passed, though, I just handed him the knife and let him do it himself. My mother even bought him one of those little tools which shuck an ear of corn and allows all the kernels to fall off at once. Eventually, I just gave up buying and cooking the actual corn on the cob.

Now, if I want to enjoy a sumptuous, butter dripping, ear of corn, I rely on a local restaurant to satiate my craving. Its hot, it’s perfectly cooked, and I don’ t have all the husks and silks scattered all over my kitchen.

On a particular visit to my favorite eating place, I noticed they were offering a new corn on the cob recipe, called Street Corn. I was intrigued. The waitress described what it was, and I had to try it. I waited anxiously for this delicacy to come to my table.

As the waitress brought the food, I could see my ear of corn sitting grandly on its own plate. The golden kernels glistened in a sheer creamy white glaze, and were basked in a bed of crumbled cheese, and bright green cilantro. I couldn’t wait to sink my teeth into it.

 The taste was heavenly. I could detect a variety of subtle spices, such as salt and pepper, yet there was also the vibrant pop of chili and cilantro. I was hooked! I took a few more bites and sighed with contentment. My son laughed at my excitement about an ear of corn, but when I made him try a bite, he changed his tune.

His eyes grew wider and he nodded in agreement with me. This was good corn! When our waitress came back to our table, I asked her if she knew how the cooks prepared the corn this way. She had no idea, but said she would ask them. When she returned, she really didn’t have the answer I was hoping for, so when I went home, I began researching.

The results came in all different ways, shapes, and forms of one single request. I copied the basic ingredients from each recipe, then created my own perfect version of this wonderful treat. I also simplified the cooking process, by microwaving the corn instead of grilling or roasting it. In all honesty, it matters not how the vegetable is cooked: its the delectable spread and accents that are added to it that make the difference. However, if you are standing at the grill, and there is space on there for corn on the cob, by all means - GRILL THEM!!


My Street Corn

4 ears of corn - husked and cleaned

¼ cup mayonnaise
¼ cup sour cream

½ tsp chili powder
¼ tsp black pepper
¼ tsp garlic powder
!/4 tsp onion powder
½  tsp cayenne pepper
½ cup Parmesan cheese

1 /2  cup finely chopped cilantro

Directions:

Remove all husks and silks from corn. Set aside.

In medium bowl, mix mayonnaise and sour cream together. Add seasonings and cheese. Stir until thoroughly incorporated. Set aside. 

Place ears of corn on a microwave safe plate. (Paper plates will not work for this recipe.) Add 4 TBL of water. Cover with another microwave safe plate. 

Place in microwave and cook for  3 minutes.  Take off top plate. (CAUTION: Plate may be VERY HOT!) Flip corn over. Replace plate on top and continue cooking for another 3 minutes. When finished, lift top plate off corn, and set cooked corn on another plate. Allow hot plates and water to cool before removing. 

Once corn is cooked, spread mixture all over corn. Apply generously. Sprinkle on cilantro before serving. Enjoy!!

Cover and refrigerate any leftover spread. Will keep in refrigerator for up to two weeks. Flavor will intensify!


*** Corn can also be roasted, grilled, or boiled, depending on your time and preference.***


Monday, July 2, 2018

Catering, College Students, and Blackberry Bars


I love young people and I love baking, so when I get to put both of them together, I am in my element. Which is why I absolutely adored my time as a caterer for the mass of college film students I met when I lived in California. It was such a privilege to be on set and watch these amazing directors turn their visions into  pieces of art for the television or movie screen. I stood in wonder of how they knew exactly what to do with each of the cameras, the actors, the sound equipment, and the lights. Every detail was calculated, and each student was responsible for conducting the set as professionally as possible according to the bylaws and regulations of the entertainment business. One particular statute decreed that the cast and crew had to be fed properly, and that was where I came in.

I catered their sets. I provided menus for the students to select from, along with flexible budgets for any size group and time period. Sometimes the shoot would last three days, sometimes it was longer. That meant different snacks and meals for each day, and different desserts to also accompany those meals.  I enjoyed every moment of cooking, baking, and providing food for all the members of the crew and cast. It gave me great pleasure to watch them devour my meals and come back for more, and more. (Remember, these were college students whose usual main source of nourishment was either pizza or ramen noodles.)  The most fun part was, of course, supplying something sweet for dessert.

The favorite dessert of all time had to be my EZ Blackberry Bars. The first time I tried out the recipe was for a small dinner party with just a couple of my son’s college friends coming over for the evening.  The night was filled with laughing, and eating and just enjoying each other’s company. Then I served dessert. I sliced the Blackberry bars into nice sized squares, and everyone raved about it. We continued to sit around the kitchen table and talk and talk for the rest of the night. Then my phone rang. I stepped out of the room to take the phone call and was gone for about 15 minutes. When I came back, however, I noticed the whole pan of Blackberry bars had disappeared! In the course of a simple phone call, those college students had devoured a whole pan of dessert.

Thus the EZ Blackberry Bars became the ultimate request for my catering business. Once the word spread, everyone had to have some. I was happy to oblige my clients, and they were happy to have something delicious to eat.  These bars are a great dish for taking on the go, for a potluck dinner, or simply for an ordinary Thursday night snack.

(Just make sure to bake it in a 9x13 inch pan;  if you have college students in your life, you’re going to need it! )

EZ Blackberry Bars

Ingredients:

1 box yellow cake mix
1 ½ cup quick cooking oats
2 tsp cinnamon
¾ cup melted butter or margarine
1 TBL water

12 oz blackberry jam or preserves
1 TBL water

Directions
Preheat oven to 375 degrees.

Combine cake mix, oats and cinnamon. Stir in melted butter and water until mixture is crumbly. Place approx. 3 cups of mixture in 9 x 13 inch ungreased pan. Press firmly to make a nice crust.

In a small bowl, combine jam and water. Stir well until jam is smooth. Spoon jam over crumb mixture. Spread evenly over crust base. Cover jam with remaining crumb mixture. Pat down firmly to cover the whole pan.

Bake for 25 minutes. Cool completely before cutting into bars.

Enjoy!


For more enjoyable and easy recipes, check out my cookbook: 

Monday, June 11, 2018

Decadent Joy Macaroons

Chocolate, and Almonds, and Coconut - OH MY!

Everyone has their favorite candy that they can’t refuse. Some people love the simplicity of pure milk chocolate. Others love to add nuts, whether its peanuts, almonds, or cashews. Many of my friends adore the combination of caramel, nougat, and dark chocolate. And if you don’t like chocolate (it could happen), there are plenty of delicious treats that only embrace nuts or coconut, mixed with honey or cream. My all-time go to candy bar is one that is filled with a crunchy buttery toffee and then coated with silky smooth  milk chocolate.

When I want a decadent treat, however, that combines everything soft, sweet, chewy, and nutty all at the same time I opt for the ultimate candy. It has the scrumptious-ness of sweetened coconut, the saltiness of a roasted almonds, and the delectable coating of semi sweet chocolate to hold all that goodness inside. I don’t think I need to disclose its candy bar name, but if you can’t figure it out, there's a clue in the picture at the end of  the article.

These three elements of chocolate, almonds, and coconut are the crux of many delicious desserts. Many people enjoy each flavor individually, and even more love the combination of two. I can’t deny a croissant that oozes of warm chocolate or gooey almond filling, nor will I refuse any dessert that sports toasted coconut drizzled with  chocolate or sprinkled with almonds.

Imagine the taste bud surprise I encountered when I first sampled this  macaroon that encompassed all the great flavors of chocolate, almonds, and coconut in one single bite. All my favorite ingredients were combined into one cookie!  I loved the fact that almonds were in every bite, instead of just two or three.
This baked goody definitely lived up to the reputation of its counterpart candy bar name. My mouth was filled with joy!

If you enjoy a luscious coconut macaroon filled with bits of rich chocolate, and lightly salted slivers of almonds, this is your kind of cookie. It is rich, decadent, and extremely filling. And although the recipe may be slightly messy or sticky, the final cookie is well worth it.

Decadent Joy Macaroons

Ingredients: 

2 - 7 oz bags sweetened shredded coconut
1 - 12 oz bag semi-sweet chocolate chips
1 cup chopped/slivered almonds
1 - 14 oz can fat free sweetened condensed milk
1 TBL coconut extract
1 TBL almond extract


Instructions:

Preheat oven to 325 F.

Grease large baking sheet with non-stick spray, or line sheet with parchment paper.
(Do not try substituting parchment paper with waxed paper. They are not the same, nor do they work the same. Wax paper will stick to your cookies! Trust me!!)

In a large bowl, stir together coconut, chocolate chips, and almonds. Add  sweetened condensed milk, and your extracts. Combine thoroughly.

Using a tablespoon, dollop out mixture onto the prepared baking sheet.

For a nice round cookie shape, moisten fingers, then shape into mounded cookie forms, patting the tops down slightly. (For a fun treat, shape into slightly elongated lines to look more like a candy bar.)

Place cookie sheet in oven and bake cookies for approximately 13 to 15 minutes, depending on your oven. Cookies are done when the coconut edges begin turning a nice golden color.

Let cool on baking sheet for 2 minutes. Then transfer to plate or wire rack. Do not let cookies sit on baking sheet too long or they may stick.

Enjoy with a cup of tea or your favorite beverage!

Recipe makes approximately 36 to 40 cookies, depending on size.


(Have you figured out what candy bar these resemble? The clue is in the name of the cookie!)


Sunday, May 6, 2018

"NELLS"


I can’t remember when I first smelled the enticing aroma of anise. It’s always been a staple in our Italian family. Whenever there was a wedding, there were anise cookies.  When there was a funeral, there were anise cookies. Whenever there was a holiday, there were anise cookies. These cookies were not all the same.  My family knew how to bake, so there were an assortment of all kinds. And it didn’t matter if the recipe was the same, each relative made a version of that cookie that tasted unique to that person. My grandmother doused her Italian cookies with a whole bottle of anise extract. My aunt only added a few anise seeds to her favorite specialty, and my cousin measured her anise zest by the teaspoons. My own recipe calls for both extract and crushed seeds, because I like my flavor strong. 

If you have never tasted or smelled anise, it is very similar to black licorice. It is also the core ingredient in the liquor “anisette.” Some people are not fond of it at all, but my family lives by it. I don’t know how many bottles of anise extract my great-grandmother, grandmother, mother, aunts, sisters, cousins, and I have used over the years, but I bet we  have been keeping that company in business for a long time. There are so many uses for it, whether it’s alcoholic beverages, breads, icings, or cookies. 


My family favorite is a delicate thin cookie called “Nells.” It is an anise flavored treat that is intricately designed and baked by placing a spoonful of cookie dough onto a particular machine, which resembles a waffle maker, and then pressed flat. Most people call this cookie a “Pizzelle,” but for years my family called it by its own nickname. I’m not sure how it all came about; (Maybe someone misunderstood the actual name of the cookie, maybe there is a relative out there who was named Nells who discovered it.) but I do know that for the longest time, I searched the internet and local stores for a Nell machine and always came up empty handed. It wasn’t until I was much older, did a friend of mine interpret my family nickname and showed me how I could buy my own Pizzelle cookie maker. I was thrilled! 


Pizzelle machines are available to buy through many department stores that specialize in kitchenware or baking. They are also found on Amazon and other internet sites. I received mine as a Christmas present, but I also bought one at Goodwill. Be aware, there are two kinds of “Nell” machines. The old fashioned ones, which my great grandmother used, are used on the top of the stove. The cookies are pressed one at a time, and then cooked over the burner. The newer machines are electric, and can bake two to four pizzelles at a time. I highly recommend the electric ones, because baking one cookie at a time takes tooooooo  long! Most batters produce 2 to 3 dozen cookies, and I, personally, don’t want to stand over a stove for a whole day - no matter how good the cookie smells or tastes. 

If you don’t own a Pizzelle maker, or you would like to try the recipe first before buying one, there is a little trick that can be used. When I wanted “Nells” so bad and didn’t have a machine, I used a waffle maker. It was one of those machines  that made thin pretty waffles - definitely NOT a Belgian waffle maker. I greased both sides of the waffle plates, placed my spoonful of cookie dough on the center, and then pressed the sides together. I only let it cook for a minute or two, because these cookies brown fast. I opened the machine, and there they were - my two “Nells.” The first two batches were a bit overcooked, but after a bit of experimenting with the time, I finally succeeded. They were thicker than the original, and didn’t have the intricate design on them, but they were delicious! My sister even thought they tasted better because they were softer and bigger. If you decide to try  the waffle machine, please be careful with your cooking time. Do not depend on the light, because it is designed for waffles, not cookies. 

Once you decide that you are ready to make your own “Nells,” try this recipe. It is the same one my family has been using for decades. It has a double dose of anise, because I use both extract and seeds. For the best flavor, I always crush the whole seeds before adding to the batter. The aroma and texture it adds is incredible. Feel free to add as much extract as you like, depending on your taste buds. I always nibble  the batter to test how much anise I want for my cookies. As I once told my niece, “If the batter tastes good, the cookies will taste good.” 

“Nells” 
(Family name for Pizzelles)

Ingredients:

3 eggs
2 cups flour
1 cup sugar
2 tsp baking powder
½ tsp salt
½ cup oil
1 Bottle Anise (1 fl. Oz)
2 TBL anise seed (crushed)

Directions:

Prepare Pizzelle machine according to manufacturer’s directions.

In large bowl, beat eggs lightly. Add oil, anise, and anise seeds. Stir in sugar.
In separate bowl, add baking powder and salt to flour. Mix thoroughly.

Add flour combination to egg mixture until dough is formed and can be dropped from a spoon onto the Pizzelle maker. If the dough is too sticky, add more flour.

Lightly grease Pizzelle plates.  Drop a tablespoon of dough unto plates and press down. Cook according to machine directions.


Carefully take cookie out of machine with spatula and place on a large cookie sheet to firm. Let cool and then stack.


While cookie is warm, it can be rolled to make an outside shell for cream or filling, if desired.

*Other flavors or extracts can be substituted for anise, such as lemon or almond. Omit anise seeds and add lemon zest or crushed almonds if preferred.*

Makes 2- 3 dozen depending on size.

Sunday, April 1, 2018

Mom's Mud Pies

Mom's Mud Pies

I was nine years old when I first met Dwayne in the fifth grade. He was tall, with blondish hair, wearing the biggest smile; and I was short with bright red hair, and the new kid in class. My teacher introduced me to everyone and told me I could sit anywhere I liked. At the time, my school was very progressive. We had no official inside walls in the building, only movable dividers. We also didn’t have traditional desks. We sat in groups of 4 or 5 at a table. A girl with long dark hair and big glasses waved me over to sit beside her. Her name was Amy and we became instant best friends. She showed me all around the school, played with me at recess, and sat with me at lunch in the cafeteria.  Amy also introduced me to Dwayne, who also sat at our little table. Amy and Dwayne had been friends since first grade, so it was only natural that I should become friends with him too.

Dwayne had an infectious laugh and usually tried to make everyone else laugh too. He was good at it. No one ever felt sad or afraid whenever he was around. He was friendly and kind to all the kids in the school. He was a big brother to the younger grades and soon became like a brother to me. No one ever made fun of me when I was hanging out with Dwayne.

As the years rolled along from elementary school, to middle school, to high school, the friendship between Amy, Dwayne, and I remained strong. We would see each other on the weekends, go to parties together, and hang out at the pool as much as possible. We all knew each other’s families; and we called each other on the phone all the time. However, when Amy found her soul mate in an older boy named Tom, the dynamics of our friendship changed. It was only natural that Amy didn’t spend as much time with us anymore, but that didn’t stop Dwayne and I from having fun.

Dwayne had become a permanent fixture in my family. He was the older brother I never had. (He was actually a year older than me. I had started school very early.) Dwayne would come over to my house, eat dinner with us, tell funny stories, and make my family laugh and laugh. My mother, especially, loved Dwayne. He could always put a smile on her face; and she would make him happy whenever she made her famous whoopie pies.

Dwayne liked to call them “Mom’s Mud Pies,“ and they were delicious! It would take my mother hours to make them, but it was worth it. Dwayne loved the creamy homemade vanilla frosting sandwiched between two cookie rounds of rich, chocolate cake. His eyes would grow as big as saucers, and his grin would expand from ear to ear, whenever Mom served them. It became an inside joke that whenever Mom made whoopie pies, Dwayne would not be that far away.

As life would have it, Dwayne and I grew up and eventually went into two different directions.

After high school, Dwayne joined the service, moved far away, and got married. I, too, became married, had a son, and moved to another state. We tried not to lose touch with one another, but priorities change and soon Dwayne and I only spoke to one another on special occasions. It was years before we actually saw each other again.

But as it happened, one day I received a phone call from my friend by accident. It was just a regular Wednesday - no holiday, no special event happening. My phone rang and I noticed it was Dwayne. I answered it, but no one was there. I guess it was a pocket dial. I hung up, and was about to continue my day per usual. Then I decided to call Dwayne back. He sounded so surprised to hear my voice; and we laughed about his butt dialing his phone for me. We vowed to stay in touch more.

 The best surprise came when I was visiting my mom and dad. I found out that Dwayne would be in the area too at the same time. We made a date to actually see each other and have dinner.
Mom suggested that Dwayne should come over to their place, so we could all enjoy one another’s company again. The plans were set, and we waited for Dwayne to arrive.

My friend hadn’t changed at all.  Still as tall as ever, however with a little less hair,  Dwayne smiled at me with that great grin he always had. He laughed and gave me the greatest bear hug ever. Dwayne’s blue eyes twinkled even more, however, when he noticed the giant plate of Mom’s Mud Pies sitting on the counter. My oldest, and dearest friend looked at my mom, and she looked at him, and the whole family was back together again.

Mom’s recipe for Dwayne’s “Mud Pies” is here for the sharing. May it bring as much joy and happiness to you as it has to our family.


Mom’s Mud Pies 
(Whoopie Pies) 

Ingredients:

(Cake)

2 cups sugar
2 eggs
2 tsp vanilla extract
1 cup oil
1 cup chocolate milk (or regular milk)
4 cups flour
2 tsp baking soda
½ tsp salt
1 cup unsweetened cocoa
1 tsp instant coffee mixed in 1 cup of hot water. (Set aside to cool.)

Directions:

Preheat oven to 400 degrees. Grease 2 cookie sheets.

In large bowl, cream together sugar and eggs. Add vanilla, oil, and milk.  Mix well.
In separate bowl, combine flour, baking soda, cocoa and salt.
Alternate adding dry ingredients and coffee water to the creamed mixture. Mix well.

Drop round teaspoonfuls on cooking sheets.
Bake for 7-10 minutes until cake springs up when touched.

Make cream while cakes cool.

(Cream)

2 egg whites
2 tsp vanilla extract
3 ½ cups confectionery sugar
4 TBL flour
2 TBL milk
1 ½ cup shortening

Beat egg whites until peaks form. Add vanilla and beat more. Add rest of ingredients and beat until smooth. Keep mixing until fluffy and not granular tasting, at least 5-10 minutes.

Sandwich the cream between two chocolate cakes.

Invite your best friend over, 
and together enjoy your Mud Pies with a big glass of milk!


More recipes may be found in my cookbook: